We finish up our "OMG, I want one of those..." Hardware Event Theme Week, with not one or two posts, but six posts from Joost van Schaik.
Yes, it's another Microsoft Band project, but it's also a Raspberry PI 2, which makes it double cool (because the two are used together to turn on a fan :)
- Reading temperatures & controlling a fan with a RP2, Azure Service Bus and a Microsoft Band (1)
- Using an Azure Service bus queue for two-way (IoT) communication
- Measuring temperatures using an UWP on a Raspberry PI 2
- Controlling a fan using a UWP on a Raspberry PI 2 remotely
- A Windows 10 UWP app to receive temperature data from a Raspberry PI 2 and control a fan using the Azure Service Bus
- A Microsoft Band client to read temperatures and control a fan on a Raspberry PI 2
Reading temperatures & controlling a fan with a RP2, Azure Service Bus and a Microsoft Band (1)
Part 1 - Idea, architecture, hardware shopping list and hardware configuration
Sometimes simple ideas have a tendency to balloon almost out of control, and this is one of them. In essence I wanted 'the other way around' compared with my previous IoT project - in stead of using the Band as a sensor device and the Raspberry PI2 as a 'display unit', I wanted to use the Band as controller. The idea was I could
- Measure temperature using my Raspberry PI2 running Windows 10 CoreIoT
- See the current temperature on my Band, including the date and time it was measured
- Send a command to my Raspberry PI2 to switch on a fan if I find things are getting too hot
- See on my Band the fan has actually switched on
- Switch the fan off again if I feel like doing so.
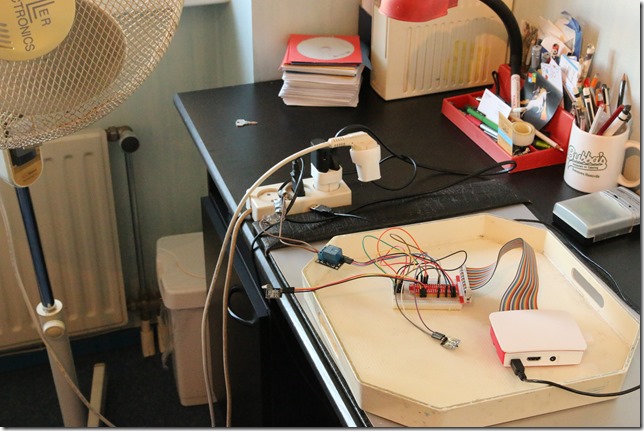
Some pictures of the resulting contraption on my desk:
The details
On my phone (or more precisely, the Windows 10 device to which my Band is paired) there is an app than can
- listen to temperature data coming from the Raspberry PI2,
- build a tile with a custom UI on my Band,
- listen to and act on events coming from that Band UI.
If I open the custom tile on my Band, the app on my phone gets a signal to transmit the last received data from my Raspberry PI2 (the temperature, last received update date and time, and whether the fan is on or off) to the Band, followed by a single vibrate. If I tap the fan toggle button on the custom UI on my Band, the app should respond to that as well, send back a signal over the Azure Service bus queue - and display on the Band the fan is on (and can now be switched off).
...
How this will be blogged
As this is quite a big project, I have decided to split the explanation into six blog posts:
- Idea, architecture, hardware shopping list and hardware configuration
- Using an Azure Service Bus queue for two-way communication between IoT devices
- Measuring temperatures using an UWP on a Raspberry PI 2
- Controlling a fan using an UWP on a Raspberry PI2 remotely
- A client app to show temperature data and control a fan
- A Microsoft Band client to read temperatures and control a fan
The idea I just described, so now we go on with the architecture
Architecture
For my previous IoT project - displaying heart rates using an LED connected to a Raspberry PI2 - you might recall I used an Azure hosted Signal/R Hub. This time, as I already said, I decided to go with a queue on an Azure Service Bus. Signal/R worked pretty well in the previous setup, but it has a few disadvantages:
- It requires you to deploy a web site, while the infrastructure for a Service Bus is 'hosted' by Azure itself.
- Signal/R signals can only be delivered real time - that is the nature of Signal/R. If you missed it, you missed it. Tough boots. A queue makes it possible to receive data for a little while after it's been sent.
- Security is a bit iffy - everyone who knows the address of my previous Signal/R hub solution can listen in on the data. Of course, I can encrypt that, or do access security - it's all kind of a hassle and it feels a bit roll-your-own.
...
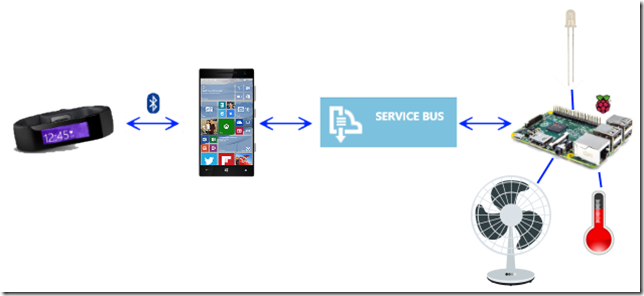
Calling this 'architecture' is a bit rich I think, but it is intended as a global overview. Although it is not entirely correct, as this picture suggest signals go between phone and PI2 (and back) over a single channel, while in fact there are two queues - one for each direction. Temperature data goes from PI2 to phone over one queue, the command to toggle the fan over the other.
...
Hardware shopping list
To run this project, you will need the following hardware:...
Running the sample solution
If you want to run the sample solution, you will at least need to
- Create an Azure Service bus
- Paste the key into Settings.cs in TemperatureReader.Shared
- Deploy the TemperatureReader app on a Raspberry PI2 running Windows 10 CoreIoT with all the named hardware attached
- Deploy the TemperatureReader.ClientApp to a Windows 10 device with a Microsoft Band to it.
A Microsoft Band client to read temperatures and control a fan on a Raspberry PI2
Part 6 of Reading temperatures & controlling a fan with a RP2, Azure Service Bus and a Microsoft Band
Intro
In the final post of this series I will show how the Microsoft Band client in this project, that is used to actually read temperatures and control the fan, is created and operated. The client has a tile and a two-page UI, looks like this and can be seen in action in this video from the first blog post:...
To recap - the function of the Band client is as follows
- WhenI tap the tile on the Band, the UI is opened and shows the latest data, that is:
- The temperature as last measure by the Raspberry PI2
- A button I can use to toggle the fan. The text on the button reflects the current status of the fan (i.e. it shows "Stop fan" when it's running, and "Start fan" when it is not
- Date and time of the last received data.
The classes involved
As you can see in the demo solution, there are three classes, and one interface, all living in the TemperatureReader.ClientApp's Models namespace - that have something to do with the Band:
- BandOperator
- BandUiController
- BandUiDefinitions
- IBandOperator
I showed a little bit of it in the previous post that described the Windows 10 UWP app itself, but to recap: the app is put together using dependency injection, so every class gets everything (well, almost everything) it needs passed via the constructor, and only knows what it gets via an interface (not a concrete class). In addition, most communication goes via events.
Start it up ...
...
So what we do is - when new temperature data arrives, _isProcessing is true (so the user has recently clicked the toggle button) and the received data indicates a status flip - then the Raspberry PI2 has received the toggle command and has acted upon it. So the button is updated from "Processing" to a value according the new fan status. If there is no status change, but the last toggle button use was longer ago then the message time-to-live of the FanSwitchQueue - we assume the command has never reached the Raspberry PI2, we update the _lastFanStatus to the old status, and update the button accordingly. In any other cases, if the user has not pressed the button recently, we just keep the last fan status. This has not much to do with the Band or the UI itself - it's just dealing with possible delays from message delivery (and possible messages not being received by the other party).
Conclusion
Making a custom Band UI is doable, but you do need to pay a lot of attention to detail to get things right. It's definitely more challenging than creating a UI using Blend, as you basically need to keep seeing the whole UI in your mind - there is no way of visually designing it or even make it visible short of running the app and checking the result on the Band. Debugging is a time and battery consuming activity. Acting upon events and having code interact with remote devices has some particular challenges too. And sometimes things just go wrong - but it is not always clear if those things were caused by me doing things wrong or not understanding the finer details of the Band UI API, the fact that I am using it on Windows 10 mobile (which is still in preview at this moment) or bugs in the various APIs (Band or otherwise) that I use to stitch things together. On the bleeding edge is where you suffer pain - but you have the most fun as well.And yet, the potential use cases are pretty appealing and are giving a nice idea of how the (very near) future of device coding with Windows CoreIoT looks like. And it has practical appliances too. Recently I was on a holiday in Neustadt an der Weinstraße (where amongst others this blog post was written so the sample location was not entirely random :) ) I had this contraption running at home - but I had put in in my study at home and had connected it to a powerful spot light in stead of a fan. I had my Lumia 1520 and Band with me - and although being physically in Germany, I was able to turn on a light at home (and get confirmation it was actually on or off) by clicking a button on my Band. Thus hopefully convincing potential burglars the house's resident geek was at his computer and the house was occupied. Not that there's much worth stealing anyway, but it's not fun to get home and find broken windows and stuff. If it had any effect - I don't know, but our house was left alone during our absence.
Well, this marks the end of a rather epic and quite voluminous blog post series.I encourage you one final time to download and check the demo solution - and build kick *ss stuff yourself with CoreIoT and/or the Band. Even Doctor Who is into wearable technology these days, and so should we all be :D
Again, here's the ToC;
- Reading temperatures & controlling a fan with a RP2, Azure Service Bus and a Microsoft Band (1)
- Using an Azure Service bus queue for two-way (IoT) communication
- Measuring temperatures using an UWP on a Raspberry PI 2
- Controlling a fan using a UWP on a Raspberry PI 2 remotely
- A Windows 10 UWP app to receive temperature data from a Raspberry PI 2 and control a fan using the Azure Service Bus
- A Microsoft Band client to read temperatures and control a fan on a Raspberry PI 2
Follow @CH9
Follow @coding4fun
Follow @gduncan411


